Protecting your Linux server with just a password is no longer enough (they're vulnerable to online and offline brute force and dictionary attacks, and people have historically done a terrible job of maintaining secure passwords): you have to protect it with SSH keys. This tutorial will teach you what SSH keys are and how to replace the default Linux password authentication with SSH key-based authentication.
Note that I used a jtti VPS for this tutorial, but this guide works for any virtual server from any other provider. Additionally, I provide a step-by-step video guide and a written tutorial.
What is an SSH key?
SSH keys are short for Secure Shell Keys. Cybersecurity researcher Tatu Ylönen created SSH in 1995, and now every Unix, Linux, and Mac computer comes with SSH built-in. They're also available for every platform and are an essential part of all cloud infrastructures.
Why should I use SSH keys instead of passwords?
Before you finish reading this sentence, a "real Holyfield" hacker could crack your server's password (PSA: always use a password manager like Bitwarden to keep your passwords secure). Hackers can use tried-and-true brute force attacks or other more sophisticated methods to get into your server.
Now, we're not here to lecture you about security hygiene or best practices (you're more than welcome to read a scare article with an eye-rolling "hacker in a hoodie" stock photo). However, we do want to emphasize that SSH keys are the way to go to protect your server because they are much longer and more complex than any password. Unlike a password, an SSH key is not sent to the server. You must protect your SSH keys with a password, though.
How to Generate SSH Keys
SSH uses pre-generated public and private keys (hence the name SSH key pair). These public and private keys are formed using asymmetric key cryptography and are stored for future use. As a best practice, we recommend generating new keys for new devices (which is more secure), but this does require re-establishing trust.
How to Verify SSH Keys
The public key is stored on your server, while the private key is stored on your computer. If you try to log into your server, the server will generate a random string and encrypt it using the public key. You can decrypt that string using the private key (which is the only way to decrypt it).
The server then sends this encrypted string to your computer. Your computer will decrypt it using the private key and send the decrypted string back to the server. If the decrypted string on your computer matches the original string on the server, you have access to your server.
How to Generate SSH Keys for Linux
Open a terminal and enter the following commands to generate a pair of keys (assuming your local computer is running Linux):
ssh-keygen -t rsa Note: You may need to choose the file name and destination for the file depending on your Linux version.
This is the default path for saving the key:
/root/.ssh
id_rsa is your private key, and id_rsa.pub is your public key.
How to Generate SSH Keys for Windows
If your local computer runs Windows, we recommend installing PuTTY, the free, open source SSH and terminal emulator (it also includes PuTTYgen).
After installing PuTTY, open the Windows search bar and search for "PuTTYgen".
You will see this screen:
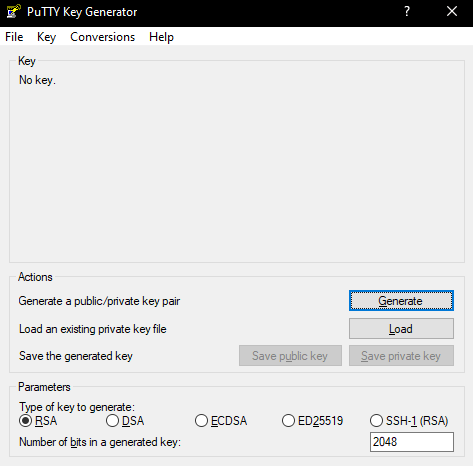
Generate SSH keys for Windows using PuTTY Key Generator.
PuTTY Key Generator has all the features to generate SSH keys.
Simply click Generate and move your mouse over the blank field.
Your key will be generated:
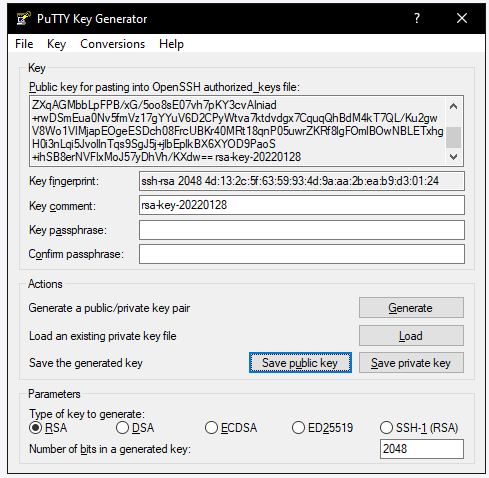 PuTTY Key Generator for Windows can create SSH keys using the RSA, DSA, ECDSA, ED25519, and SSH-1 (RSA) algorithms.
Look at that public key! It's so public (and hopefully secure).
How to Add Comments to Existing Public and Private Keys (Optional)
You can add comments to an SSH key by entering a space after it and typing the comment. If you look up the BSD System Manager Manual, you'll see that lines starting with # are treated as comments.
How to Assign a Key Password (Optional, but Recommended)
Assigning a key password will increase the security of your private key by encrypting (and decrypting) it locally. You'll need to enter the key password every time you connect to the server (the key password is another layer of security for connecting to a server - almost like 2FA).
How to Upload an SSH Public Key to Your Server
Once you've created your key pair, you'll need to upload the public key to your server. You can upload the public key via FTP or the server console.
Upload the public key via FTP
If you want to upload the public key using FTP, start the FTP program and connect to the server as root. Create the following directory in the root directory:
.ssh
Now create the authorized_keys text file in this folder and paste the entire public key into it. Now save the file.
Upload the public key via the console
Log in as root via SSH. With this command you can create the correct directory and switch to it at the same time:
mkdir /root/.ssh && cd /root/.sshNow create and open the authorized_keys text file using the following command:
nano authorized_keys Paste your entire public key and press [CTRL+O] to save the file. To exit the editor, use [CTRL+X]
How to use SSH private keys in PuTTY:
After creating a key pair consisting of a private key and a public key and uploading the public key to the server, you need to insert the private key into PuTTY.
To do this, open PuTTY.
Under "Category" on the left, you will see a list of categories such as "Window" and "Connection". Follow these four steps to select your private key:
1: Click "Connection" to expand.
2: Click the "[+]" next to "SSH".
3: Click "Auth" to open a window on the right
4: Click "Browse" to select your private key
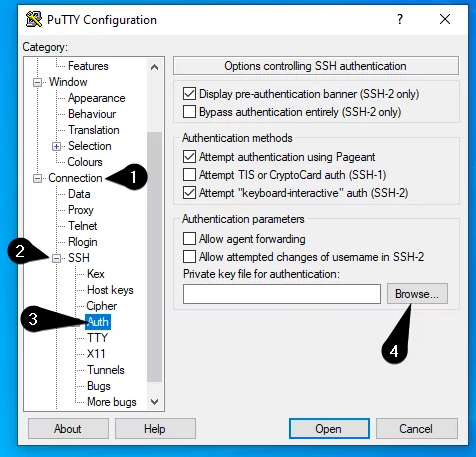 Follow these four steps to select your private key through the PuTTY key generator.
You can select your private key through the PuTTY key generator in four steps.
Now scroll up the left list and click on "Session".
Enter your server's IP address and select a profile name in the "Saved Sessions" field.
Click the "Save" button to save your profile.
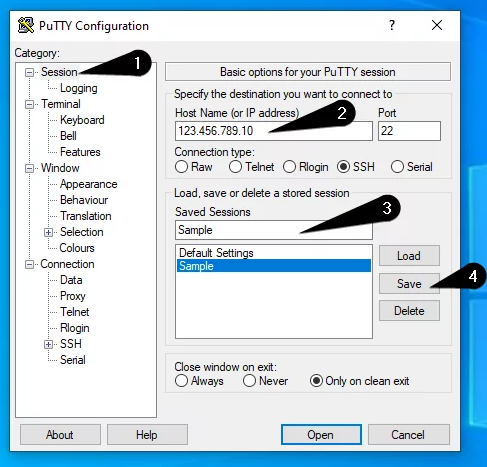
PuTTY Setup 2
Now you have created a profile in PuTTY with your private key.
How to use your SSH private key in Pageant:
In addition to inserting your private key into PuTTY, you can also use Pageant.
Pageant is an SSH agent that comes with PuTTY.
With this program, connecting to your server using your private key is much easier.
If you use Pageant, you don't have to type your password over and over again, as long as you have protected your private key with a password.
First, search for Pageant in the Windows search bar. After executing this program, it will appear in the Windows system tray:
 To import your private key into Pageant, right-click on the Pageant icon and click Add Key.
The File Explorer will open and you will need to select your private key. If you decided to protect your private key with a password, you will be asked to enter it.
Now you can simply log into your server without being prompted for a password every time you start an SSH connection.
Note: After restarting your local computer, you will need to import your private key again.
Testing SSH Key Authentication and Disabling Password Authentication:
After successfully generating your key pair, uploading your public key to your server and creating a PuTTY profile using your private key, it is now time to test if your new login method works.
Testing SSH Key Authentication
To test if your new authentication method works, simply log into your server using the PuTTY profile you just created. After double-clicking on the profile, a console will open prompting you to enter your username, which is usually root.
After entering your username and confirming it by pressing [Enter], you will be logged in. In addition to this, the following message will appear during the login process: "Using public key <key comment> for authentication".
Disable password authentication
The reason for choosing ssh-key authentication as the login method is for server security. Therefore, it is logical to disable password authentication now.
To do this, open sshd_config with the following command:
nano /etc/ssh/sshd_config Now set the following values to "No":
Challenge-Response Authentication
Password Authentication
Use PAM
To avoid scrolling through the entire configuration to find the value you need to change, you can press [CTRL+W] to open the search field. Type the name of the value and press Enter.
If some values are commented out with a # in front of them, just delete it.
Save the changes with [CTRL+O] and close the editor with [CTRL+X]
Remove SSH Key Authentication and Re-enable Password Authentication:
If you ever want to go back to password authentication, you can just set the value in sshd_config back to "Yes".
Then delete the .ssh folder and its contents with the following command:
rm -R /root/.sshRestart the ssh service using the following command:
systemctl restart ssh


